
Making Wood Signs with Text That Really Stands Out
Utilizing the strengths of a laser cutter and CNC router can combine to make some really nice effects.
Plan out the design
Laser cutters are really good for doing fine outline cutting. CNC routers are really great for pocketing out intricate holes. Combining these features can make really great sign where the letters stand out boldly. I drew up the lettering in Inkscape, saved file as .dxf in order to import it to my cutting software.
CNC route the letter places
For creating the g-code for the routing of the profiles I use the software CamBam. I will cut with a 1mm end mill, which will carve out all the letters nicely. The timber I am going to cut into is Spotted Gum, which is fairly hard, so I will only cut 0.5mm deep at a a time and run slowly at 200mm/s. The wood I am going to cut the letters out of is 6mm thick, so I will cut the letter place out to a depth of 2mm, so the letters will stick out a few millimetres. This is going to take a long time (probably 2-3 hours) to cut. I could speed it up by only doing the edge at 1mm, then carving out the inner with a larger size that I can also run faster, but I try to avoid tool changes during a job if I can and I'm in no rush.
With the file prepared I send it to the CNC router computer and use Mach3 control software to run the cutting routine.
While Spotted Gum is very tough, it cuts perfectly and leaves very clean edges. This makes it ideal for being able to handle some of the thin lines in the font I chose for the sign. It most likely wont need much in the way of sanding when done.
Planning the routing with cambam
Cutting ot the places for the letters
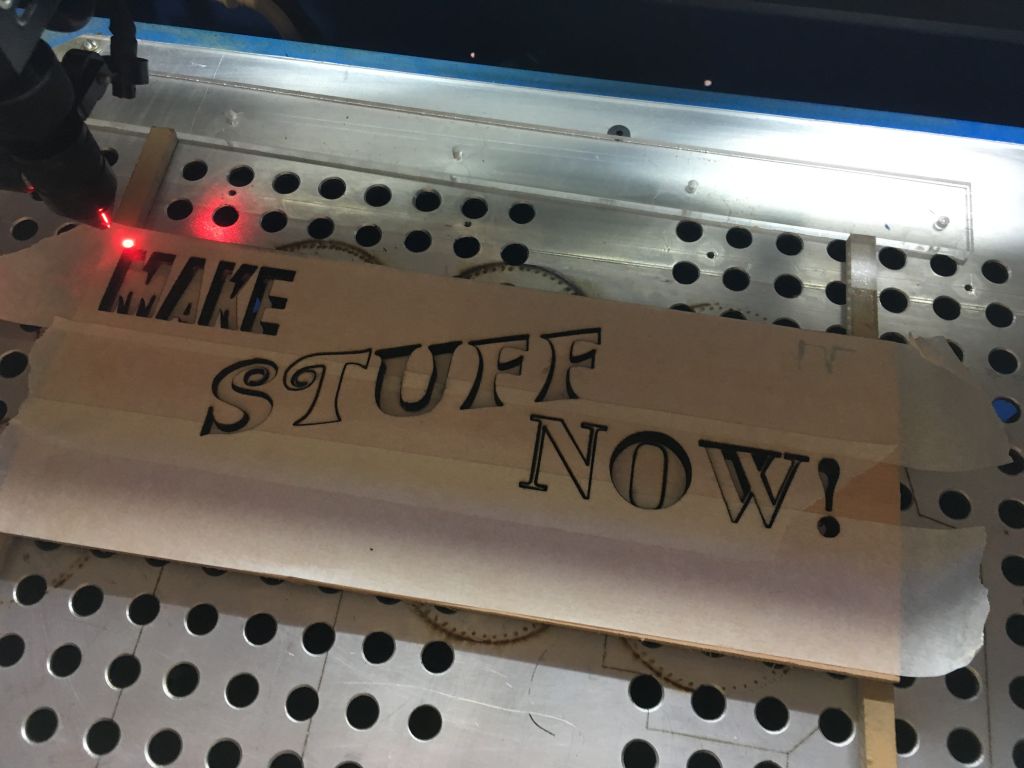
Cut out the letters
The letters are being cut out of a 6mm piece of Fiji Mahogany. This will come out in a nice orange colour when I oil it at the end. I put some masking tape over the surface to stop burn marks from spreading over the top surface of the wood. As some of the lines are fairly thin I don't want to have to sand it more than necessary. The perfectly aligned laser cuts out the letters easily. Then I give them a soak in a solution of ammonia and hot water to seal off the burnt edges a bit so the soot doesn't spread when I handle them later. Still experimenting on best detergents to use for this.

Put all the pieces together
With the letters cut and the holes cleared out it is time to glue the pieces together. First I give the Spotted Gum base a sand, as I won't be able to do it once the letters are in place. I use a brush to apply the glue so I don't apply too much. Any glue seeping up through the cracks will be very difficult to remove later.
Once dry I give the top surface of the letters a gentle sanding with 320grit paper. Finally I apply burnishing oil to give it a nice shine. I give it two applications of oil about 2 hours apart, and buff firmly but carefully with a microfiber rag after each oiling.
And now I have a great looking sign for my website branding that not only looks good, but showcases some of the crafting techniques that the website is all about!


