
Laser Cutter Mirror Alignment
Proper optical alignment is critical to getting a consistent cut at all points over the table. This is how to correctly set any laser cutter system.
A bit of theory
I'll briefly go over a bit of the optics to explain what we are trying to achieve in the alignment. If you prefer to just trust me and get on with it, skip ahead to next section.
I sketched a little diagram to illustrate the difference between setting the laser position compared to the laser direction. For some reason most instructions focus too much on centering the laser on the first 2 mirrors, which isn't really that important.
So in my diagram I have drawn 2 mirrors to represent the movable mirrors on the laser cutter rail. 3 different colours represent 3 different laser alignments. Now both the red and green line aren't aimed at the center of the mirrors, but they are aligned parallel to the direction in which the mirrors move between figure A and B. Because of this directional alignment it doesn't matter how far up or down the mirrors are shifted, the two beams leave the bottom of the diagram at exactly the same point in each figure,so are therefore properly aligned. Compare this with the blue beam which does hit the center of the first mirror in figure A. But since it's direction is not aligned properly, when the mirrors get shifted in figure B. the point where the blue line leaves the bottom of the diagram is very different than it was in figure A. If you find your laser performs a bit weaker when you move the laser head to the far end of the table, it most likely means your laser is aligned like the blue beam and you need to fix it.
This is why you shouldn't be too hung up on making sure the laser goes through the middle of the mirrors (the first and second one anyway). Sure it should be close if the mirrors are positioned properly, but anywhere on the mirror not too close to the edge is ok. There are 2 good reasons why you shouldn't worry about going through the center anyway;
- The mirror mount types are kinematic mounts; they pivot on 3 points around the edge, not about the center of the mirror. This means that even if you have the beam aimed straight at the center, when you adjust the angle of the mirror the beam will no longer be hitting the center, but will now be slightly off. A special type called gimbal mounts are designed to pivot around the center of the mirror. These mounts can be much more expensive so are usually used only in systems where the beam direction will require constant changing. For a 'set and forget' arrangement like in the laser cutter, cheaper kinematic mounts are sufficient.
- The beam will burn the mirror slightly in time. So if the burn mark is off-center, when you take the mirror out to clean you can just rotate them a bit when you put them back so you now have a fresh new piece of mirror in the beam's path.
All that being said, it will be important at the very last mirror to have the beam centered on to the lens (for optimum focusing), so the third and final mirror will need to be aligned and centered for best cutting performance.
When trying to align, as a general rule: tilt the mirrors to control the beam direction, shift the location of the mirror mounts to alter the beam position.
Align the laser
Put some masking tape or painters tape over the first mirror mount hole, just after the laser. If you only have the bare mirror without the nice cover pieces like I have pictured, then you will need to set up a post-it note or something similar in front of the mirror. make sure what ever you use sits about a millimeter away from the mirror and not touching it, or else you could burn soot into the mirrors. Set the laser pulse so it burns a small but easy to see hole (50% power for 50ms is a good setting for a 50W laser). make sure the laser makes a hole fairly close to the middle of the mirror area. If not then you will have to loosen the laser mounting brackets and shift the laser tube as best you can. As long as you have the laser position and direction lined up ok by eye, within a millimeter or two of the center of the mirror, then it should be good enough to continue.
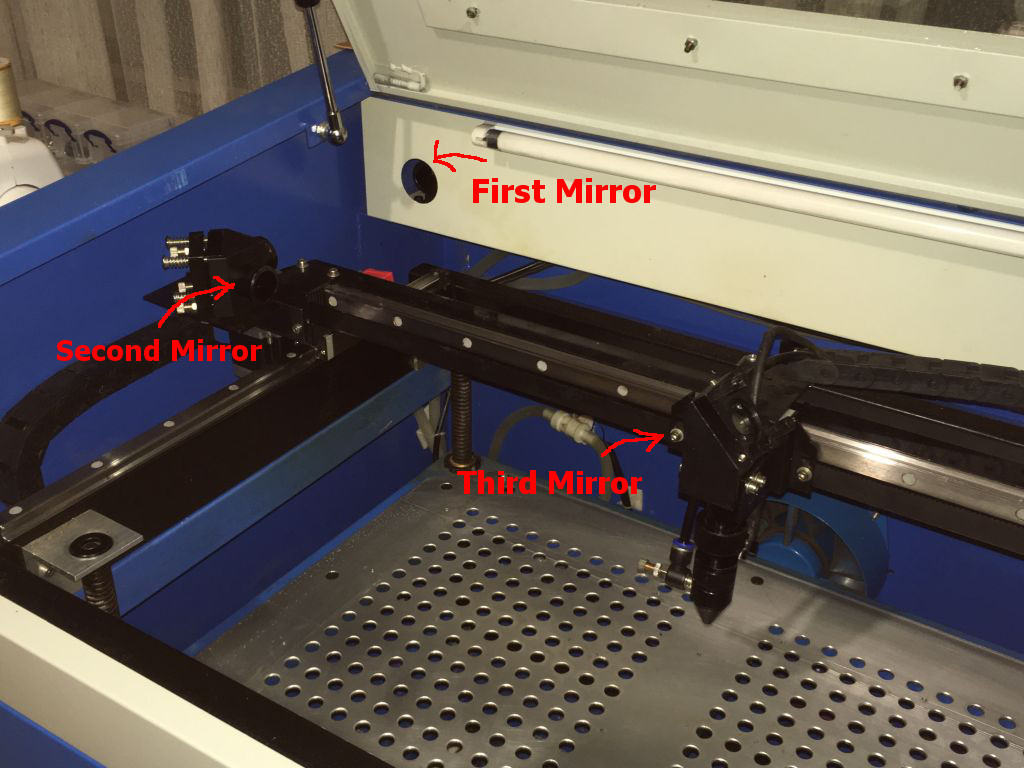


Set the first mirror
For this step you will need to adjust the set screws on the first mirror (the one you lined up in the previous step), to target the beam on to the second mirror. There may be a nut you need to loosen first to allow the set screws to be turned.
Place tape over the second mirror and move it as close up the the laser as it will go. Pulse the laser and burn a hole.
Now move the second mirror as far away as it will go, keeping the now burned tape on the mirror. You should see a hole hopefully somewhere near the middle of the tape (If not then the first mirror is way off and you need go back and to adjust that before proceeding). No pulse the laser and burn another hole. You should now see 2 holes burnt onto the tape, hopefully close together, ideal precisely on top of each other.
The second hole you just burnt should give you an idea of which way the beam is pointing. You need to now adjust the screws on the first mirror so that the beam moves back closer to the first spot you burnt. After a minor tweak to the mirror put on fresh tape and move it back forward towards the laser and repeat the procedure again. You will need to keep repeating this, adjusting the first mirror until you get to a point where both the near and far hole burn exactly on top of each other. This final point should be within about 2-3mm of the center of the mirror. If it is much further off than that you need to physically move and re-position the mirror mounts (more details at bottom of page).


Set the second mirror
Before the second mirror is set make sure the bed is nice and level and the laser lens head assembly is lined up perpendicular to the table. This can be easy checked by using an engineering square as pictured. Loosen the bolts holding the head assembly to the mounts and align everything up square. Once set tighten the bolts again.
Now place tape over the 3rd mirror and move it as far left (close to mirror 2) as it will go. Burn a hole. Now move mirror 3 as far to the right of the machine as it will go (away from mirror 2) and burn another hole. Just as the same with the last mirror, the aim is to adjust mirror 2 until we can move mirror 3 to the far left and right and have the laser burn a hole in the same location.
Now for this final mirror you want the aligned beam to be as close to the center of mirror 3 as you can get. If it is aligned straight (ie. the near and far burn holes line up) but not in the center, then you will need to physically loosen the bolts holding in the mount for mirror 2, move the mirror where it needs to be, and check the alignment again. Detail on having to move the mirror mounts are at the bottom of the page.


Finally set mirror 3
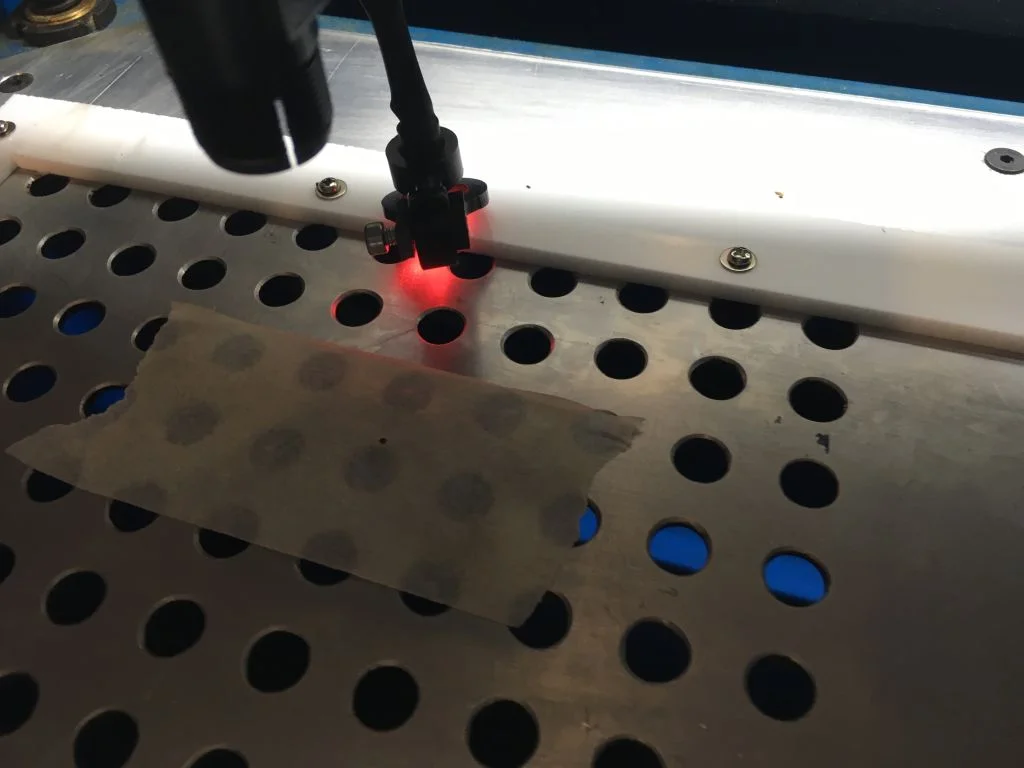
To set the last mirror, remove the lens and anything else attached to the bottom of the final laser lens assembly. The beam should hit mirror 3 and come straight out down the the tube on to the table. It is crucial that the beam is going through the center of this one in order to get the maximum cut depth possible.
Place tape on table, move table as far up as it will go and burn a hole. Now move the table down about 20cm and burn another hole. Using the same procedure as the last 2 mirrors, we want to adjust mirror 3 so that both hole burns over top of each other.
Now this mirror is a massive pain in the arse to set, but it has to be done. If you can get the 2 burn marks within about 1mm from each other when moving the table up and down 20cm, that should be good enough for any work you are going to do.
Once you think it is aligned, place some tape over the bottom hole of the laser head assembly, burn a hole, and use a mirror or something to make sure the beam is coming out fairly close to the middle of the tube. If it is then you are done, otherwise:
- If the beam is off-center in the forward/back direction (perpendicular to the movement of mirror 3) that is bad, and either the beam is not hitting the center of mirror 3 properly (go back and check) or you don't properly have the beam lined up straight. Either way you need to go back a step or 2 and try again.
- If the beam is off-center in the left/right direction (parallel to the motion of the mirror) this is ok and not unexpected. What this means is that mirror 3 is tilted correct, but either slightly too far forward or back. So if the beam is a little to the left of center, then the mirror needs to be pulled back. Give each one of the 3 set screws on mirror 3 a quarter turn anti-clockwise and test position again. Likewise if the beam was right of center, give each screw a quarter turn clockwise to shift the mirror in slightly. Slowly repeating this process should eventually get the beam centered.


It might seem like a lot of work but mirror alignment makes all the difference between having a machine capable of cutting out 8-10mm timber, or a piece of junk that barely cuts 2mm acrylic.
Note on physically moving mirror mounts
In some steps I mentioned that you may need to physically shift the mirror mounts if the beam ends up being way off center. The basic principle is that often on an optics table you adjust the direction of the beam by tilting the mirror and adjust the position by shifting the physical location of the mirror. The mirror mount bolt holes have a bit of slack, so loosen the bolt and shift the mounts around slightly. A little movement is all you should need, just experiment with positions and see where the beam goes.
Depending on experience, don't be surprised if the first time you try to do a proper alignment it takes well over an hours. Don't get disgruntled. If you think you have really messed up then go right back to step one. This is by far the most important setting up task you need to do.
After aligning the mirrors, it is a good idea to check the focus.